Rule #1 – Always Look Cool

The past two weeks here in Cincinnati have reminded me just what humidity is all about. While the static charge in my garage at home is at an all-time low, the humidity is enough to make me wish I had gills to breathe. Even rucking before work has become a rather sweaty event. When I am rucking, one of the 4 Rules of Rucking is, #1 Always Look Cool. This is an idiom as in don’t let people see you sweat. If you are stressed, just stay cool, keep a level head and look the part. A good pair of aviators always helps to hide what your eyes can’t.

Then I open my garage fridge, because every Midwesterner has their old kitchen fridge in the garage, right? Grab a nice cold aluminum can out. And before I can put it in a thermal insulating housing, I see the condensation of the humidity forming on the aluminum. This makes me think of some of the electrical panels I encountered during my time in machine shops.

I once approached a vertical machining center whose spindle chiller, with a thermo-couple failure, had been cooling the spindle continuously during the summer months. This spindle looked like the ice-cold aluminum can I had sitting out on my workbench yesterday. Fully covered in condensate from the humidity in the air. Condensate collected on an aluminum can and leaving a ring of water on a workbench is one thing. Water running down a high-speed spindle and causing issues with a dry machining process is another. This also reminded me of a recent call where a new customer wanted help sizing a Cabinet Cooler System to replace an air-to-air heat exchanger that had failed. When walking through the information needed to size the panel, I reached the Internal Temp Desired field, and there was a pause. While I thought maybe they were checking their notes, they came back with 72°F. I wrote down the value on my notepad, then asked, “That’s oddly specific. Is there a piece of equipment that alarms out over 72°F that we are trying to protect?” The response I received was no. So I asked what the need was for this low set point.

I dug further with them, and it turned out that’s what they kept the engineers’ office set for in the summer, so they thought my question was odd and figured, if they are comfortable there and their computer on their desk operates well, then it must be a good temperature. This is not an incorrect statement. The control cabinet for the machine would operate just fine at 72°F; however, all the electronics that were in the panel were rated up to 104°F before they overheat, so it doesn’t quite make sense to extend the cooling capacity needed to reach that 72°F requested set point. Once we talked this over, we settled on the standard of 95°F for the internal set point with the understanding that by using a thermostatically controlled system, they could adjust it down lower if they really wanted to. In the end, we saved them some energy by sizing the Cabinet Cooler System to meet the demands of their industrial electronics, not what makes a person feel comfortable.

This isn’t always the case; occasionally, there is a panel that requires a low maximum temperature in order to keep a critical piece of equipment stable. This is why we ask the questions to validate any concerns with the data we are viewing as Application Engineers. This is also why we have built in a number of warnings/alerts on our Online Cabinet Cooler Sizing Calculator.

If you have a panel that needs to be cooled, the online calculator has fields for all the information we need. If you want to walk through the math behind the calculator and talk through the reasons we ask for the information that we do, you can either call, email, or even live chat with an Application Engineer, and we will gladly walk you through our process and the math to determine which Cabinet Cooler System is right for your needs.

Brian Farno, MBA – CCASS
National Business Development Manager

BrianFarno@EXAIR.com
@EXAIR_BF

How One Customer Improved Safety and Reduced Noise with a Simple Retrofit

I recently had the opportunity to help a customer facing some serious concerns about their compressed air usage. They had just completed a safety audit conducted by a third-party firm, and one of the main issues identified was the use of handheld blow guns throughout their production floor.

“Thumb guns” are especially popular for blowoff because of their compact size, ergonomic design. and low price.

Even though the tools in question were commercially available and marketed as having “safety tips,” the auditors recorded noise levels exceeding 90 dBA—well above the acceptable threshold. The audit team explained that to maintain a safe work environment, noise levels needed to stay below 84 dBA, and the simplest way to get there was to address the blow guns being used.

That’s when the customer turned to us for help.

We discussed the application in detail, and it quickly became clear that EXAIR’s Model 1100 Super Air Nozzle would be a great fit. Not only does it significantly reduce noise levels—down to 74 dBA—but it also meets OSHA’s 30 PSI dead-end pressure requirement, ensuring operator safety in the event of a blocked nozzle.

This customer wasn’t focused on maximizing air output or performance—they simply wanted to make their environment safer for their team. What made this installation even better was the unexpected benefit: while addressing the safety concerns, it also reduced compressed air consumption. A win-win.

It’s always rewarding when we can help customers meet compliance goals and improve safety, but it’s even better when we can go beyond their expectations and help them uncover savings they weren’t even looking for.

Free testing. Verifiable data. EXAIR Efficiency Lab.

If you’re dealing with high noise levels or safety compliance issues around your compressed air applications, don’t hesitate to reach out. Our team is ready to help you find a solution that protects our people, meets regulations, and improves overall efficiency through the EXAIR Efficiency Lab.

Brian Farno, MBA – CCASS
National Business Development Manager

BrianFarno@EXAIR.com
@EXAIR_BF

Sometimes Plans Go Sideways – And That’s Okay

I often write and share personal experiences here. It’s kind of funny—if you had asked me 15 years ago whether I’d be writing regularly, I would have said, “Absolutely not.” That sentiment actually ties in well with today’s message.

Last night, I decided to tackle a maintenance issue on a 2014 Honda Pilot that’d been graciously loaned to us while we saved up for a newer vehicle for my wife. Her van’s transmission failed, and the cost to repair it just didn’t make sense. The Pilot has had a persistent clunking noise whenever it hits a bump. Upon inspection, I found both sway bar links were completely shot—the grease boots were torn, and the sway bar bushings were totally rotted. I had ordered the parts last winter with a few others, and I finally had time in my schedule to take care of them.

If you’ve ever worked on sway bar links, you know they usually don’t come off easily. Still, I kept a positive mindset and tried to remove the nuts holding the links in place—with zero success. So, out came the saw. I was able to cut the driver-side link out, and that’s when I should’ve realized things wouldn’t go smoothly.

My cut on the lower bolt was off and left too much of the stud. So, I grabbed another tool: the angle grinder. I’m not afraid to use the right tool—or to get rough when needed. With the sway bar supported and my hearing protection on, I went to work. It wasn’t a perfect job, but eventually I used a punch and hammer to knock out the remnants and moved on to the top mount. That one backed off halfway, then got cut at the threads and came right out. Thank goodness for sharp saw blades.

With the old link gone, I removed the deteriorated bushing and installed the new one without any trouble. Then came time to install the new sway bar link. These replacements were serviceable with grease fittings—a nice little upgrade for this older vehicle—so I had a good feeling they’d be the last ones it would ever need.

Oddly, the two new links (bought at the same time) came with different styles of lock nuts. One was slightly smashed into an oblong shape. The top nut went on snugly, but just as I was torquing it down, the Allen key recess began to round out. Not a huge deal, since I didn’t anticipate needing to take them apart again.

But the bottom stud and oblong retaining nut didn’t go so well. Halfway on, the nut tightened up severely, and the hex recess rounded out. All I could think was, “It shouldn’t be this hard.” I used the small wrench that came with the new links, and it popped loose—finally. Then I resorted to using vise grips on the flats.

Here’s where I made my mistake: I didn’t slide the grease boot out of the way and kept going. Just as I reached the last thread, the pliers slipped and pinched the brand-new grease boot. I still finished the installation—knowing I’d have to remove it again anyway—and wanted to make sure nothing else was out of alignment. At the time, I felt defeated by a simple task. This really shouldn’t have been so difficult.

In the end, I ordered another new sway bar link. It’s on the way, and I’ll attempt round two in 3–5 business days.

So, what’s the point of this story? Things don’t always go as planned. Sometimes it’s because you miss something or don’t trust your gut when something feels off. Other times, it’s stubborn determination to force something that just isn’t working. You can either dwell on it or take a breath, make a new plan, and keep pushing forward with the same energy.

I’ve seen this play out not just in car repairs, but in travel, my career, and life in general. When something doesn’t go right, it’s okay. Just adjust and move forward. It’s a mindset we bring to our work with customers at EXAIR.

That’s why our 30-day guarantee matters so much. If a recommendation didn’t work out, or testing pointed in one direction, but the results just weren’t there, we’ll help you rework the plan. We’ll back what’s already been done by covering any stock product with our 30-day guarantee and help chart a new path forward.

We’re not perfect, and we never claim to be. My plans don’t always work out either. But a failure doesn’t mean the end—it just means it’s time for a new plan of attack.

Brian Farno, MBA – CCASS
National Business Development Manager

BrianFarno@EXAIR.com
@EXAIR_BF

Big shout-out to my youngest daughter for snapping the photo of the passenger side and spraying down the rusted studs with Aero Kroil while I was at work, and she was enjoying summer break. It definitely pays to have your kids pitch in on these projects.

Just Needs A Little More To The Left

I’ve come across many applications where customers run multiple different parts or products along the same line, and each requires some form of blowoff before moving to the next stage. Too often, a system designed for just one specific part can’t keep up with the variations. Sometimes the “solution” ends up being to crank up the compressed air, which is wasteful and inefficient.

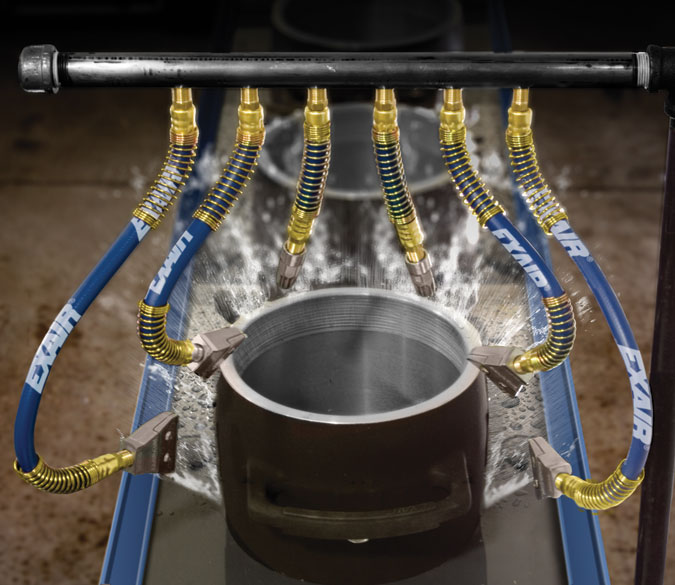
Instead of increasing air pressure or fabricating new mounts every time there’s a changeover, consider installing EXAIR’s Stay Set Hoses or Swivel Fittings.

            Stay Set Hoses are flexible and hold their shape once positioned, making them ideal for quickly adapting to different parts on the line. Available in 1/8″ and 1/4″ MNPT fittings (or a mix of both) and various lengths, these hoses can support anything from a Nano Super Air Nozzle to a Super Air Amplifier—or even a Super Air Knife. Repositioning them is easy: just bend the hose by hand to aim the airflow exactly where it’s needed for the new part.

                Swivel Fittings may be a better fit if your application doesn’t require much flexibility but still needs occasional fine-tuning. These allow up to 25 degrees of movement off axis, are made of durable 303 stainless steel, and help you easily refocus nozzles without a full tear down.

If your blowoff system isn’t keeping up with your line changes, it might be time to explore how Stay Set Hoses and Swivel Fittings can bring efficiency and adaptability to your process.       

Brian Farno, MBA – CCASS
National Business Development Manager

BrianFarno@EXAIR.com
@EXAIR_BF